

Are you thinking about learning how to surf, but not sure where to start? Maybe you have surfed a few times but just haven’t got the hang of it? If so, you are in the right place!
To many people, surfing seems intimidating and out of reach. There is no denying that surfing is difficult to learn. Learning how to surf is challenging, and there is a significant learning curve that can be tedious to overcome.
That said, surfing is incredibly rewarding and engaging. In fact, surfing becomes a lifetime hobby and passion for many people, just because it is so fun!
The reality is that anyone can learn how to surf. Contrary to popular media depictions of professionals surfing huge waves, surfing can be casual and safe for the average person.
So what are you waiting for? Continue reading this guide to boost your surfing knowledge and learn how to surf efficiently and safely!
What to expect when learning how to surf?
On the surface (pun intended), surfing may not seem so hard. After all, how difficult can it be to stand up on the board while a wave pushes you?
In fact, surfing can be quite challenging. In order to catch and ride a wave, you have to successfully execute each step of the surfing process:
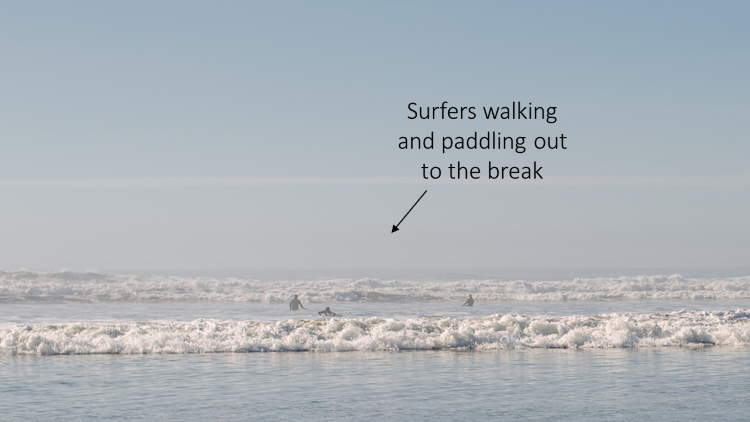
- Walk and/or paddle out to the break
- Read and understand the waves
- Choose your wave; be in the right place at the right time
- Orient yourself and the board in the correct direction
- Be in the right position on the surfboard
- Paddle strong enough to catch the wave
- Stand up once you are on the wave
- Avoid falling over after you stand up
- Always surf safely and respect surf etiquette
If you have surfed before, you understand that surfing is not as easy as some people make it look. Surfing is difficult because you need to complete each and every step mentioned above. In reality, it takes a lot of failing to learn how to surf successfully.
The important takeaway here is, keep your expectations realistic. It takes most people weeks, months, or even years to learn how to surf, depending on how often they practice.
As a beginner, you may feel uncomfortable and frightened. Of course, this is normal for most people in a new environment, especially one as dynamic as the ocean. You may struggle with one, some, or all of the steps listed above. That’s okay, it is all part of the learning experience.
The ocean waves are a dynamic system that takes experience to navigate. In summary, be prepared to put in some effort to learn how to surf. Trust me, you will be glad you did! Who knows, maybe someday surfing will become one of your favorite things to do.
How to read waves and understand the system
Before we discuss how to catch a wave, it’s important to have a clear understanding of how waves work. This might seem trivial, but it really is important.
Waves are created by winds, currents, and tides. Therefore, they are always changing. This means that, at a particular surfing spot, the conditions often change quickly and without warning.
Types of surf spots
There are several types of surfing spots, also called “surf breaks”. These are beach breaks, reef breaks, or point breaks. In all of these cases, the waves push up into something (the sand, reef, or rocks) and “break”. A wave breaks when it turns from smooth water into white, foamy water.
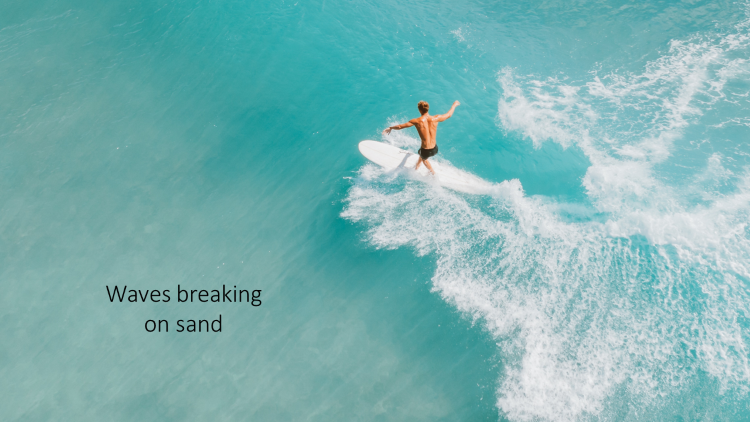
Beach Breaks
Beach breaks occur when waves collide with a beach. That is, the waves are pushed up against the sandy ocean floor and then they break. Beach breaks can be great when surfing for beginners, because there is less risk of injury if you wipeout and hit the ocean floor.
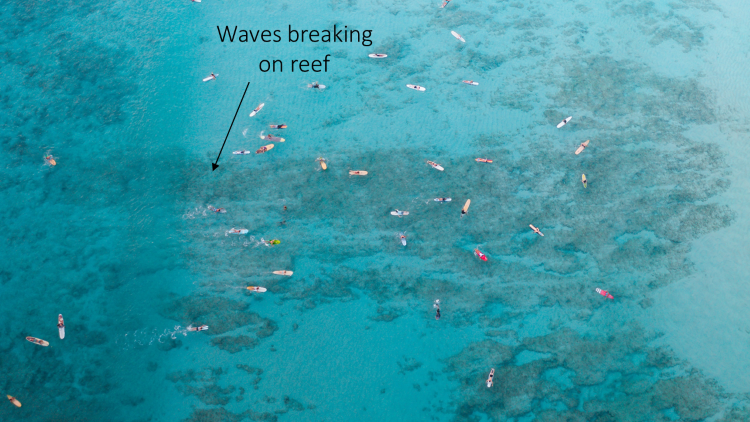
Reef Breaks
Reef breaks occur when the waves collide with a coral reef or rocks. Fortunately, reef breaks can create clean and consistent waves, but they can also create bad injuries if you fall and hit the reef or rocks.
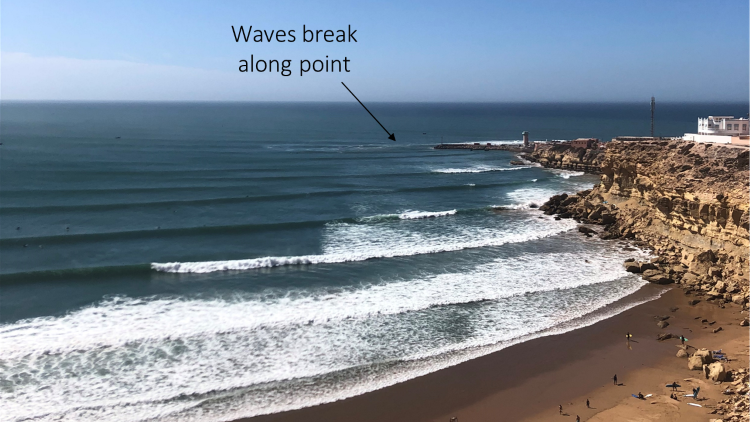
Point Breaks
Point breaks occur when waves break evenly along a point of land. That is, the waves break from one side to another as they come into contact with the land. Sometimes, the waves can even wrap around the landmass slightly. Point breaks can produce consistent and clean waves and can be good for beginners.
What types of waves do surfers ride?
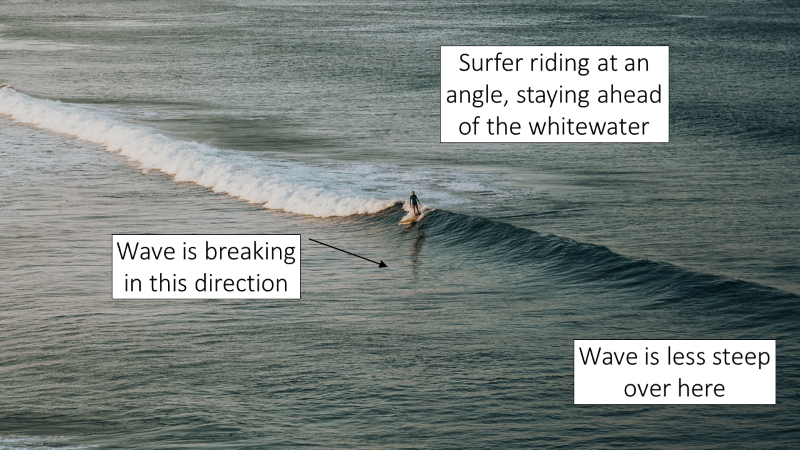
Typically, surfers catch the wave just before it breaks, because that is when it has the most power and the most fun to ride. It is best to “ride the face” of the wave, which is the part that is not yet broken.
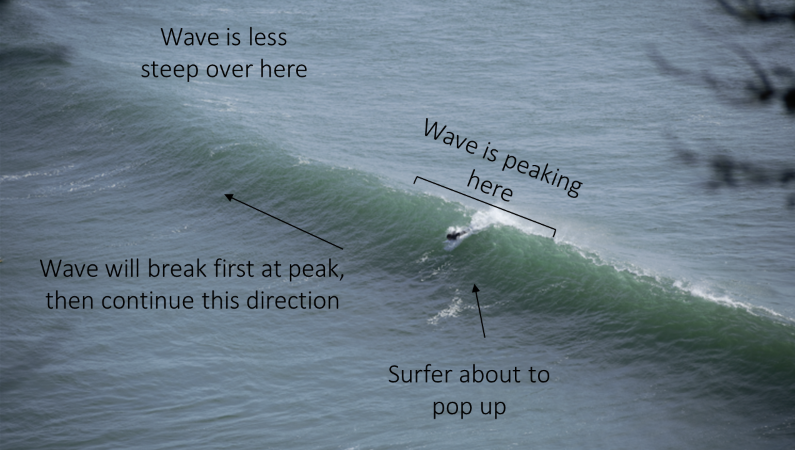
The best waves to surf break from one side to another at an even pace. For example, from right to left. The best way to ride a wave is to surf the wave as it is breaking, in the same direction it is breaking.
When you first start, it is okay to ride the whitewater, but you want to work up to riding the face. That’s where the real fun is! We’ll talk more about how to position yourself to catch a wave later.
How to paddle out to the break
Getting out to where the waves are breaking can be challenging and even scary depending on the conditions. Sometimes, it may not be smart to attempt to paddle out.
Make sure that the waves are not too big for your skill level. Generally, beginner surfers should surf waves smaller than three to four feet tall. Before you attempt to paddle out, make sure you understand how to surf safely and avoid dangers.
The size, frequency (period), and strength of the wave depends on the surf spot. The conditions will dictate how difficult it is to paddle out to the break. The larger the waves and the shorter the period, the more difficult it will be to paddle out. We will talk more about reading the conditions later.
The main idea is to get through the zone where the waves are breaking in the fastest and most energy conserving way possible. This means trying to time your entry when there is a lull between sets of waves.
Typically, managing the surfboard while trying to paddle out to the break is one of the hardest things about surfing for beginners. After all, trying to paddle into breaking waves is not something people do in their normal life.
How to get past breaking waves
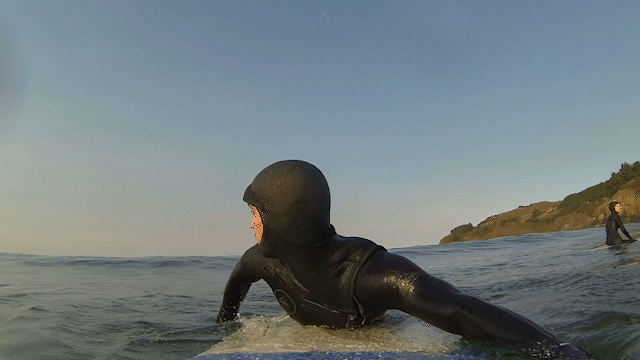
For beginner surfers, I recommend walking as far as you can until you can’t stand anymore. During this time, lift your board and jump over the waves as they roll in. Then, when you can’t stand anymore, hop on your board and start paddling.
While you are paddling out, if you need to get over a broken wave that is relatively small (1-2 feet) you can push your upper body up away from the board. This effectively pushes the board down into the wave, and you float over top of the wave. This position is called an upward facing dog for all you yoga people.
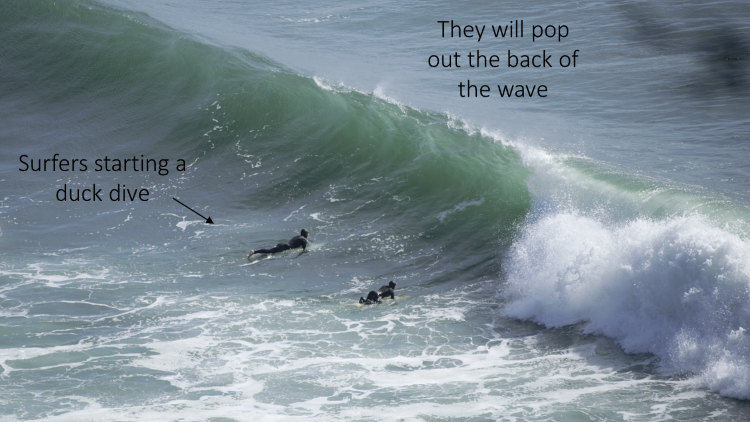
More advanced maneuvers like duck diving and turtle rolling (yes both are real surfing terms) are helpful to get past larger waves. At a certain point, when the waves get above two feet or so, it is more efficient to go under the wave rather than over it.
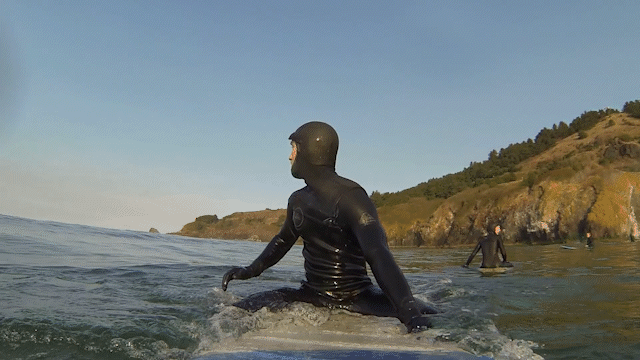
If you make it out to the break, you can sit on your board, relax and celebrate getting past the impact zone. At this point, you should be watching for waves coming in, even if you are still resting.
How to duck dive
Duck diving is an intermediate to advanced maneuver that helps surfers with short to mid length boards get past (or rather under) larger waves when paddling out to the break. The main goal of duck diving is to get past the wave and resume paddling out as quickly as possible.
To execute a duck dive, paddle straight toward the wave that is coming toward you. Then, right before it hits you, push the nose of your surfboard down as deep as you can. Next, push the tail of your board down with one foot, effectively submerging your whole body and surfboard beneath the wave.
As you start to float up, pull the nose of the board back toward your body. If done correctly, you will surface behind the wave still on your board. Now, you can continue paddling forward.
How to turtle roll
A turtle roll is a comparable maneuver to a duck dive but is meant for longboards. Duck diving is effectively impossible with longboards, so the next best thing is a turtle roll.
To execute a turtle, paddle straight toward the wave that is coming toward you. Then, before it hits you, flip yourself and the board upside down, so you are underwater, underneath your upside-down surfboard. Then, after the wave passes over you, flip yourself and your board back upright and resume paddling.
As a beginner surfer, you should familiarize yourself with duck-diving and turtle rolling! Successfully executing these maneuvers will save you a lot of energy when paddling out to the break. It takes a bit of trial and error to learn these methods, but well worth it in the long run.
What is getting caught inside?
The term “getting caught inside” means you are in the impact zone where waves are breaking. Getting caught inside is not where you want to be for more than a wave or two.
Surfers get caught inside after they catch a wave and are starting to paddle back out, or when they paddle out for the first time. It is also possible to get caught inside when you fail to catch a wave but end up paddling in a little bit and the next wave breaks.
How to catch and ride a wave
Once you are out at the break and sitting on your board, you can start to think about actually catching a wave. Catching a wave consists of several steps:
Step 1: Choosing the right wave
The first step in catching a wave is choosing the right wave. Like all surfing concepts, choosing the right wave is a skill that is learned with experience. In general, you want to catch the wave right before it breaks.
However, if you are a true beginner, I recommend catching the waves after they break (that is the whitewater). Then, once you feel comfortable, paddle out to the break and try to catch waves before or as they are breaking.
Spatially, you want to be at the peak of the wave or close to where the wave is breaking. Surfers usually start at the peak of the wave and either surf to the right or to the left at an angle. Surfing directly towards the beach means you won’t be able to ride the face of the wave, which is where you ultimately want to be.
Step 2: Paddle into position
You may need to paddle to get into a better position in order to catch a wave. Ideally, you want to catch the wave right before it breaks. Where this happens depends on the wave.
At some surf spots, the wave breaks as a peak, meaning you could catch the wave at the peak and ride it to the right or to the left. At other spots, like point breaks, the waves break from one side to another consistently.
As you sit in the water on your board, you can be watching for waves rolling in, and be ready to paddle into the right spot in order to catch the wave right before it breaks.
Step 3: Orient your board towards the beach
Once you are in the right spot, it’s time to orient your board towards the beach. This can be surprisingly difficult for beginners because they are not used to managing their board.
I recommend sitting up on your board and moving a bit more to the back of the board. Then, with the nose out of the water, move your feet in a circular motion to rotate your board. It takes a bit to get the motion down, but eventually the movement becomes a habit.
Step 4: Position yourself on the board
The size of the wave and your position relative to the wave that you are trying to catch will dictate where your weight should be on the board. This is one of the hardest parts for beginners to learn.
The general idea is, the further back you are on your board, the more you are “breaking”. The more in the middle you are on the board, the faster you will go.
If the wave is steep and you are catching it a little late, then you want to be further back on the board, so you can slow yourself down as you catch it. Alternatively, if you need more speed to catch the wave, then you want to be in the middle of the board.
If you find you are having trouble catching waves, try shifting your weight more towards the middle. Alternatively, if you are nose-diving, scoot a bit more towards the back of the board.
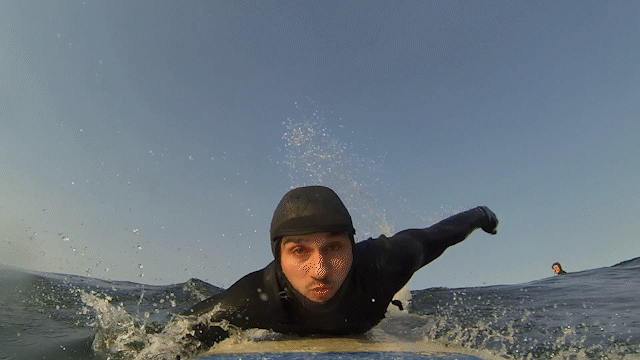
Step 5: Paddle into the wave
Now that you are facing the beach and the wave is coming up behind you, you need to paddle to build up speed so you actually “catch” the wave. Paddle hard to make sure that you catch the wave.
You should turn your head side to side and look “down the line” of the wave to either side. In this way, you are preparing yourself to catch the wave, but also examining how the wave is forming. If the wave is peaking, you may be able to choose to go either right or left. Other times, you may only have one choice.
Remember that you can bail out anytime before the wave gets to you. To bail out gracefully, just sit up on your board and put your legs into the water, effectively stopping your forward momentum.
If you are committed to catching the wave, then paddle hard. Once you feel the wave pushing you and you stay on the wave without paddling you are ready to stand up!
Step 6: Pop up to your feet
Once you are firmly on the wave, you can try to stand up. Standing up can be a single motion pop-up to your feet, or it can be a multi-step process.
First, push your upper body into an upward facing dog position. Then, either jump up to your feet in one motion, or bring your front foot forward into the center of the board with your back knee down on the board. If you can, lift your back knee up and position your back foot near the end of the board.
You can either put your left foot first, which is normal for most people, or put your right foot first, which is called “goofy foot” where I am from. If you don’t know which you are, try both and see which feels more natural. Always put your leash on your back foot.
Step 7: Balance!
If you stand up successfully, you can try to turn and ride the face of the wave. Typically, the first turn you make is called a downturn in which you turn from facing the beach to facing “down the line” of the wave and effectively end up facing 45 degrees or so towards the beach.
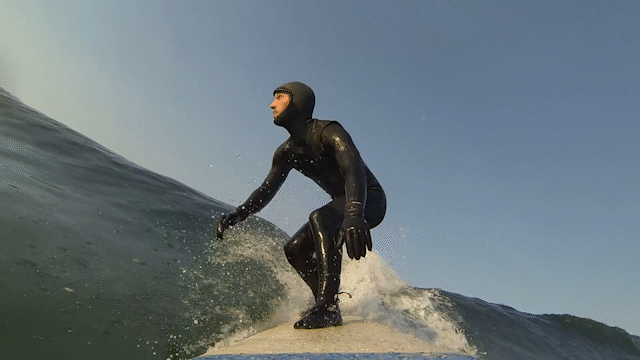
In this way, you are riding the wave at an angle instead of going straight into the beach. This will keep you on the face of the wave and extend the length of your ride.
Remember, you can shift your weight even after you are standing. Try to shuffle your feet if you need to redistribute your weight. The best longboard surfers can walk up and down their board with ease in order to change their weight distribution.
How to make turns
Typically, one major goal when learning how to surf is to stand up and ride a wave successfully. Most likely, this will be riding straight toward the beach. This is an awesome achievement for beginner surfers!
However, once you get that part down, you can start to practice turning. Making turns can be challenging, but once you understand the concepts and build up muscle memory it becomes second nature.
The principle of turning is the same for all surfboards, regardless of shape or size. Of course there are some differences in the details, but the main idea is consistent.
To make a turn, shift your weight to the back of the board and to your back foot. By pressing down on the back of the board, the front of the board will lift slightly out of the water. Then, use the back foot as the pivot point and use the front foot to push to board in the direction you want to go.
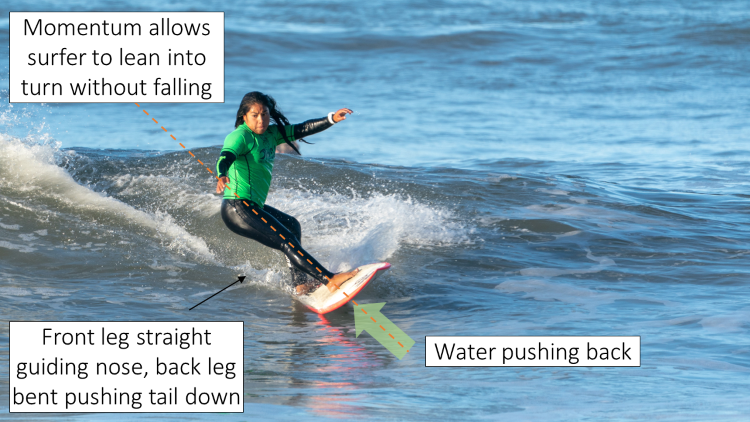
The caveat is that speed is needed to make the turn. In other words, you have to be moving fast enough to actually be able to make a turn. It can be hard for beginners, who are hesitant to catch larger waves, to get enough speed to actually make a turn (or even to stand up).
How to choose a beginner-friendly surf spot
Each surfing spot is different, and many are not suitable for beginners. It is essential to surf at a spot that is appropriate for your skill level.
Some surfing spots are almost always suitable for beginners, while some spots are only for advanced surfers. Whether or not a surfing spot is suitable for beginners depends on the risk factors (e.g., rocks, reef, currents) and the conditions at any given time.
If you are unsure of beginner surf spots in your area, get some advice from someone you know who surfs. Ask them what surfing spots are good for beginners and which ones to avoid. You can also call your local surf shop and ask them. Learn more about how to choose a beginner surf spot.
How to read a surf forecast
Once you have a list of potential beginner surf spots, you need to learn how to read a surf forecast. When learning how to surf, understanding how to read a surf forecast lets you know if the conditions are appropriate for your abilities, and if it is worth surfing.
Even surf pots that are suitable for beginners can be too dangerous if the waves are too big or the currents are too strong on the day that you go. High winds can also be a safety issue.
An example of a simple surf forecast is shown below. Note the two separate tables. One focuses on the waves and the wind and the other on the tides and daylight.
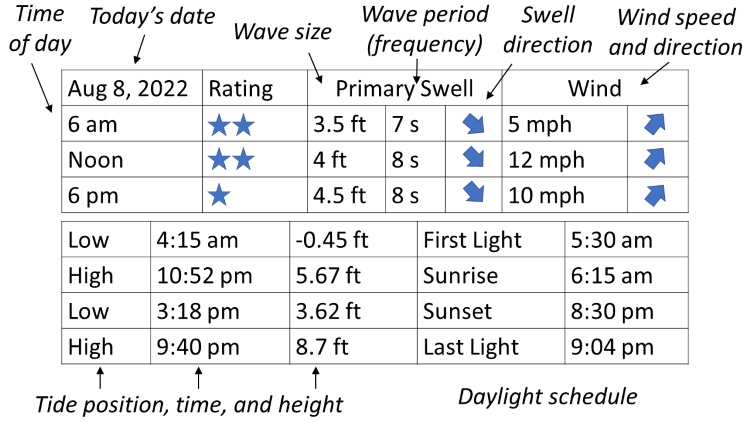
The conditions are given for different times of the day. Some websites forecast conditions for multiple days. Sometimes a rating, calculated by an algorithm, is provided to estimate the quality of the conditions.
In this example, the primary swell size, period, and direction are listed. Sometimes, the secondary swell information is listed, but I only ever worry about the primary swell. The waves start at 3.5 feet high and increase to 4.5 feet throughout the day. It is important to note that the waves may vary quite a bit from this number, with both smaller and larger waves possible.
The period (or frequency) of the wave is around 7 and 8 seconds. Generally, a longer period is better because the waves are cleaner, with less smaller waves to clutter the good waves. However, a very large period (more than 14 seconds) can also lead to larger, more powerful waves. See the table below for the range of conditions and corresponding quality, specifically for beginner surfers.
| Not Ideal | Getting Better | Best | |
|---|---|---|---|
| Wave Size (Feet, Meters) | < 1 ft, > 5 ft < 0.3 m, > 1.5 m | 1 – 4 ft 0.3 – 1. 2 m | 2 – 3 ft 0.6m – 0.9m |
| Period (Seconds) | < 7 s | 7 – 10 s | > 10s |
| Wind (mph, m/s) | > 15 mph > 6.7 m/s | 8 – 14 mph 3.6 – 6.3 m/s | < 8 mph < 3.6 m/s |
| Swell Direction | Depends on location | ||
| Tide | Depends on location |
Learn more about how to read a surf forecast for beginners.
How to find surf forecasts online
Two websites I recommend for surf forecasts are Magic Seaweed and Surfline. I find that they sometimes provide different data, with the disagreement being as high as two or three feet. Usually though, they are pretty accurate and comparable in my experience. I like Magic Seaweed because you can see forecasts for surf spots near you on a map.
A final note on surf forecasts. If you ever have any questions about the conditions, give your local surf shop or rental company a call. The employees are usually pretty in tune with the waves, especially if the conditions are good and they surfed before work! Learn more about the best online surf forecast.
How to choose a beginner surfboard
Now that you have an idea of the basics of surfing, let’s shift focus to surfing gear. Choosing the right surfboard is critical to being successful while learning how to surf. Learning how to surf on the wrong surfboard can lead to a whole lot of discouragement and frustration. Trust me, I have been there. Learn more about how to choose the right beginner surfboard.
Anatomy of a surfboard
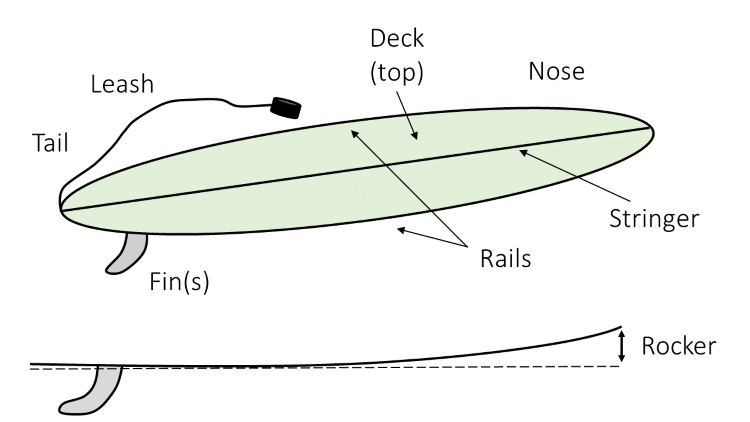
It is worth it to quickly cover the parts of a surfboard, at least to establish the correct terminology. Note in the image below the two terms that are lesser known to beginners: stringer and rocker. The stringer is a wooden piece that runs through the center of the board from nose to tail and adds support to the structure of the surfboard. The rocker is the degree to which the board curves when looking from a sideways perspective.
What are surfboards made out of?
Surfboards are made out of several main types of materials. There is a real science to it that has been evolving ever since people started surfing with wood boards. As a beginner, just know that surfboards are either hard-tops or soft-tops.
Rest assured, both hard-tops and soft-tops are great for surfing for beginners, as long as they are large enough. However, once you start to improve, you may shift to a hard-top because of the better maneuverability.
| Hard-tops | Soft-tops | |
| Pros | Better performance (maneuverability) | Super durable Lower risk of injury from collision Usually more affordable No wax needed |
| Cons | May not be as durable Higher risk of injury from collision Usually more expensive | Worse performance (maneuverability) |
| Conclusion | Best for beginners who have the basics down and want to progress to the next level | Best for true beginner surfers who are learning the basics. Good for kids or older people who may have more trouble managing a board |
Best surfboard shape and size for beginners
Surfboards come in many different shapes and sizes. Seriously, there is a ton of variety, and many are not suitable for beginners. Choosing the right board while learning how to surf is essential for beginner surfers.
Notice the variation in size and shape of the surfboards in the image below. While there is a ton of technical lingo to categorize and describe the wide array of surfboard shapes and sizes, there generally four main categories: short boards, mid-length boards, fun boards, and longboards.
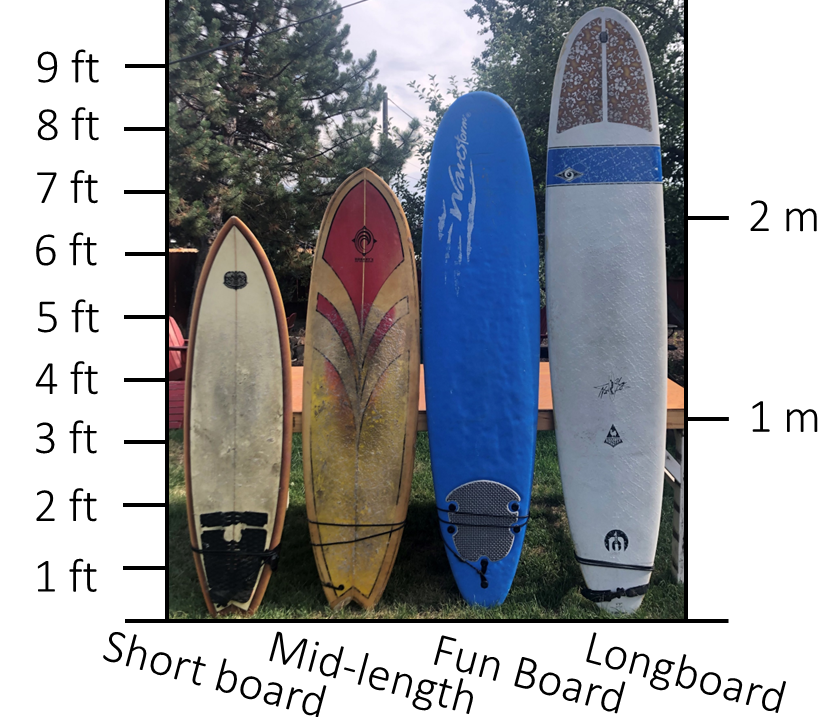
Don’t worry too much about the terminology. Just choose a board that is long, wide, and thick. In other words, choose a board with high volume. This is because high volume surfboards are more buoyant and that makes catching waves easier.
A general rule is to learn how to surf on a surfboard that is 3 feet longer than your height. Ideally, find one that is more than 20 inches wide. Generally, a longboard or a fun board is the best option for beginners. Fun-board are great for children or smaller adults. Again, these can be soft-tops or hard tops.
Should you buy or rent a surfboard (and wetsuit)?
Learning how to surf is a financial investment. You either have to buy your own gear, rent, or take a lesson (which includes a rental). Surfboards and wetsuits are not exactly cheap, although it is relatively affordable compared to other outdoor sports like surfing and rock climbing.
Beginner surfers often face a choice between buying and renting. The table below breaks down the advantages of each option.
| Buying | Renting | |
| Cost | Surfboard: $200 – $600 Wetsuit: $200 – $400 | Surfboard: $25 – $50 per day Wetsuit: $15 – $30 per day |
| Pros | Save money if you surf often Get familiar with your board | No upfront cost No commitment No storage, transport, or maintenance |
| Cons | Up front cost Commitment Storage, transport, and maintenance | Most costly if you surf often Harder to get used to your surfboard Time deadlines for pickups and returns Potentially lower quality gear |
| Conclusion | Best for people who are committed to surfing and surf more than 2 – 3 times per year. | Best for people who are on the fence about committing or who surf less than 2 -3 times a year. Also good for those who are not able to store or transport their gear. |
Think about if buying or renting is right for you. I recommend buying your own gear if you are planning to surf more than a few times each year, or if you are dedicated to learning how to surf.
How to save money when buying a surfboard
There are many ways you can save money on surf gear. When buying a surfboard specifically, I recommend considering a used or second-hand surfboard.
Used boards are more affordable than new ones, and although they can have some wear and tear, you can find a good deal on a functional surfboard if you are patient and know what to look for.
The downside of buying a used surfboard is that you have to know how to check the board for damage and get a fair value. It can be hard to tell if the surfboard is watertight when you buy it, especially if it is a hard-top.
If you are interested in looking for a used surfboard, read more about how to buy a used surfboard to avoid making costly mistakes.
Beginner surfboards I use and recommend
The Wavestorm
The Wavestorm is a classic beginner soft-top surfboard. Many people have learned how to surf on a Wavestorm or a similar board. It is wide, buoyant, and super durable.
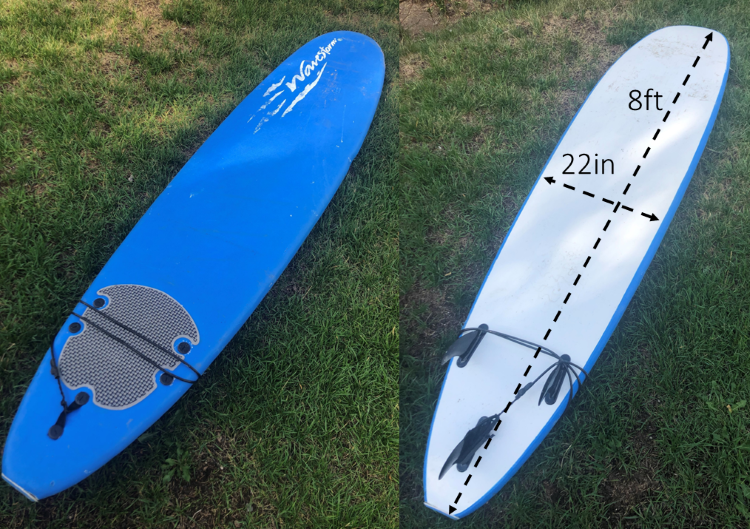
Wavestorms are usually about 8 feet long, which is perfect for children and lighter adults. However, if you weigh over 160 pounds or so, a longer board might be better, but not necessarily essential. Of course, you can get similar soft-tops (aka “foamies”) that are larger.
I have owned a Wavestorm for years and it is perfect for taking friends surfing who are beginners. It has taken a real beating over the years, and it is still holding strong. Here it is on Amazon, but you can also find it in some surf shops.
BIC Sport E-Comp NAT Young Longboard
The BIC Sport E-Comp NAT Young Longboard is a great longboard for beginners. At 9 feet 4 inches, it is a true longboard. This is a great board for everyone learning to how surf, although it might be harder for kids to manage than a Wavestorm. This board is made out of epoxy, which is a durable material that won’t ding easily.
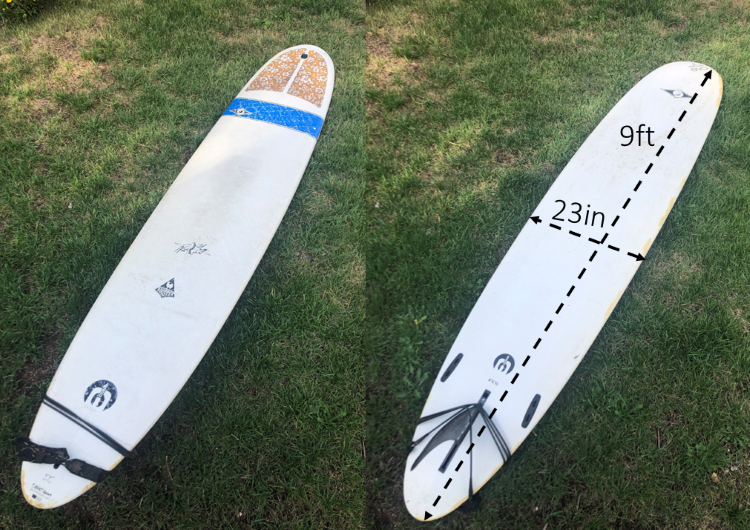
I bought this board myself second-hand and did some repairs. I love it. It is perfect for myself and my partner (who is still a beginner). This is a great option for surfers with a few waves under their belt and ready for a step up from a soft top, because it is more maneuverable.
Unfortunately, this particular board is not made anymore, but there are many similar options out there, like this one. Learn more about how to buy your first surfboard.
Other surf gear you may need
In addition to a surfboard, you will need some other gear. Some of these are optional depending on your surfboard and your location.
Wetsuit
Depending on the water temperature in your region, you might need a wetsuit, gloves, booties, and a hood. Wetsuits can be expensive, but they are essential in some places. Where I surf in Oregon, a wetsuit is always required.
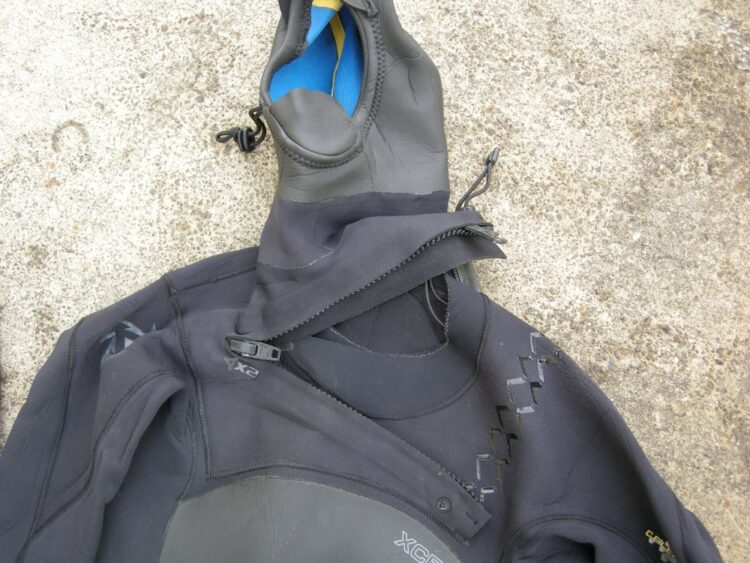
I always recommend buying a wetsuit in person after you are able to try it on. I find that it is difficult to get the right fit for a wetsuit when you can’t try it on first. It is important for your comfort in the water that the fit is as good as it can get. They cost around $200 to as much as $400 when bought new. Go to an outdoor store or a surf shop.
Sometimes, you can find a good deal on a used wetsuit. For a used wetsuit, you can expect to pay less than $150, unless it is in like new condition. If you’re on a tight budget or just want less commitment, read about how to buy a used wetsuit. Buying a used wetsuit can also be a good option for kids who grow quickly.
Rashguard
A rashguard is sometimes needed in warmer waters where you don’t need a wetsuit but still need some protection. A rashguard will protect your skin from rubbing against the deck of the surfboard. It will also keep the sun off you. Unlike a wetsuit, you can probably buy a rashguard without trying it on first. Here is one for men and one for women.
Surfboard leash
A surfboard leash will keep you attached to your board. A leash is necessary for safety, to prevent your board from hitting others as well as guaranteeing you have a floatation device. You’ll want a surfboard leash that is at least as long as your board. Here is one with good reviews.
Surfboard bag
A surfboard bag is optional but preferred for more expensive boards that you want to protect. Surfboard bags help prevent dings and can extend the lifespan of your board. They can be pricey, so I only recommend them if you have a nice surfboard that you really care about. You don’t need a surfboard bag for a soft-top surfboard.
Surfboard fins
Usually, when you buy a surfboard, the fins come with it. However, if you don’t have fins, you will have to get some online or from your local surf shop. There are many different types of fins. As a beginner, don’t worry too much about the type of fins.
Surfboard wax
If you are using a hardtop, you will need surfboard wax. Surfboard wax keeps the surface of the board sticky, so you don’t slip off. There are different types of surfboard wax for different water temperatures.
Earplugs or hood
If you are surfing fairly regularly, it’s important to prevent water and sand from getting in your ears and causing “surfer’s ear”, which is when the ear gets beaten up and starts to constrict. This can lead to hearing loss and even require surgery. The two solutions are to use special surfing earplugs or a hood.
I have never used surfing earplugs myself because my wetsuit has a hood. I have heard from other surfers that sometimes the earplugs will fall out during a wipeout. You can also buy a wetsuit hood by itself if your wetsuit doesn’t have one.
Surfboard rack and/or straps
You will need some way to transport your board to and from the beach. If you are a beginner, chances are you are using a longboard and your surfboard won’t fit in your car.
There are a lot of fancy racks out there, but if you already have a rack on your car, I recommend getting a set of lashing straps and a pool noodle. Cut the noodle in half and slice it so that it wraps around your rack and pads the surfboard.
If you don’t already have a rack, something like this padded rack is a great option. One of my friends has something similar to this fancy rack which is a bit pricier but locks.
Towel or surf poncho
If you use a wetsuit, you might need a towel or surf poncho to change into it. This is because most people (myself included) prefer to wear nothing under their wetsuit. A surf poncho is just a poncho made of towel like material that makes changing into your wetsuit convenient.
A poncho is not necessary, because a towel is just fine, but it can be warm and worth the price. You can also make your own!
Surfing etiquette you need to know
Understanding and adhering to surf etiquette is an essential part of learning how to surf for beginners. Surfing etiquette is a set of guidelines that exist to help everyone stay safe in the water and all surfers should know the rules, regardless of skill level. It is especially important to follow etiquette on crowded days.
That being said, as a beginner, you will make some mistakes. After all, mistakes are how you learn. Other surfers will be more lenient towards beginners because they understand that you are a beginner. Still, try your best to learn and follow the etiquette.
Who has priority?
A major part of surf etiquette is following the rules of priority. This way, only one person catches each wave and collisions are avoided.
The surfer who has priority is the one that is closer to the part of the wave that is breaking. That is, the surfer who is further from the part of the wave that is breaking has to yield.
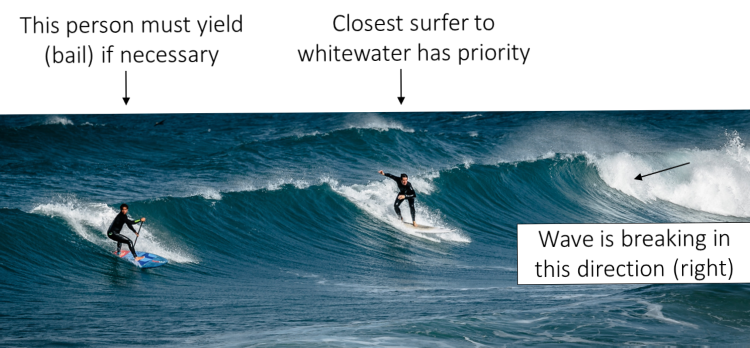
When the surfer who is further from the part of the wave that is breaking cuts off the surfer who is closer, that is called dropping in or snaking someone’s wave. Don’t do that! People will get upset.
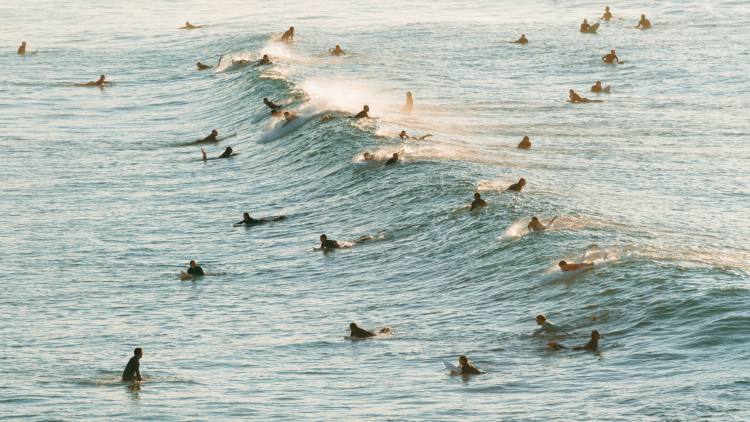
How to avoid other surfers when paddling out
Usually, when you are paddling out to the break, people are catching waves and surfing them in, around the same area you are paddling. Therefore, you could potentially get in their way and cause a collision.
When paddling out, either go through the whitewater, or outside and around the surfer. See the image below for a helpful visualization.
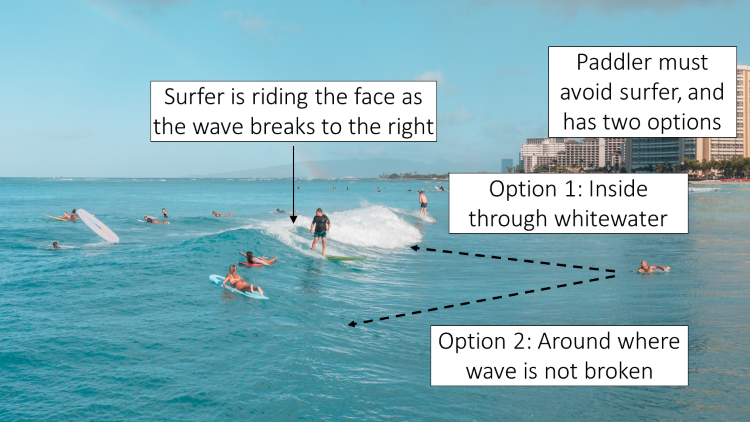
It is the responsibility of the person paddling out to the break to get out of the way of the people surfing, even if this means having to duck dive or turtle roll.
Avoid letting go of your board when paddling
Whenever possible, avoid letting your board out of your control when paddling. This is a major safety point that is important to prevent injury to other surfers around you.
Letting go of your board when you are paddling out to the break, or even standing in the waves, is dangerous for other surfers because your board could hit them. This happens most often when a big wave comes in, and beginner surfers who cannot duck dive or turtle roll ditch their board.
Ditching your surfboard is sometimes the best option for really big waves, especially if you have a longboard. This allows you to swim deep under the wave and retrieve your board after the wave passes.
However, this should only be attempted if you know there are no other surfers within proximity to you. Also, when compared to a duck dive or turtle roll, ditching your board takes much longer to start paddling again.
Respecting the lineup
The lineup is a term that refers to a loosely-defined queue of surfers waiting for their turn to catch a wave. The lineup is a general guideline that surfers follow in order to share the waves equally, ensuring everyone gets their turn, and also making it easier to track priority, thereby avoiding accidental drop-ins and collisions.
Some surf spots have a more defined lineup and others have no lineup. Also, if it is a crowded day, then it gets harder to track who’s turn it is to ride a wave. However, if there are only a few people in the water, it is easy to take turns so everyone gets their fair share of waves.
It is less important for beginner surfers to adhere to a strict lineup. This is because beginner surfers are just learning the basics, and the lineup is really more of an advanced concept. Nevertheless, it is important to be aware of why the lineup exists.
Respecting the locals
Although nobody owns the waves, it is important to respect the surfers that live near a given surf spot. This is especially important if you are surfing internationally in a different culture from your own.
For example, if you are flying to Hawaii and plan to go surfing, make sure you research which surf spots are appropriate for beginners and tourists. There are always spots that are designated for tourists. That way, you won’t get in the way of local surfers.
Learn more about how to follow surfing etiquette.
Safety in the water
It is paramount to be safe when surfing. Understanding and adhering to the proper safety precautions are essential for all surfers, but especially for when you are learning how to surf as a beginner.
Surfing, like other outdoor activities, has inherent risks. The ocean is powerful and unpredictable. The conditions such as the waves, currents, and wind, are constantly changing.
The main dangers while surfing are the currents, large waves, other surfers, and your own board. I cover all of these dangers in more depth in my article: How to surf safely and avoid dangers. I urge all beginner surfers to read this article before paddling out.
Common surfing mistakes and how to learn from them
Learning from your mistakes is a big part of improving in any activity and life! Surfing is no different. In fact, when you make a mistake surfing, it is critical that you understand why it happened and how to correct it for next time.
| Reason or Mistake | Solution |
| I can’t make it out to the break or I am very tired when I do make it out. | Take advantage of duck dive and turtle roll maneuvers. Walk your board until you can’t stand, then start paddling out. Focus on paddling form (e.g., cupped hand, chest lifted up off of board, feet out of water, keep weight in middle of board). |
| I can’t paddle hard enough to catch a wave. | Make sure you’re using a large surfboard. Focus on paddle form. Catch the wave right before it breaks, not too early. Scoot towards the front of the board. Some waves are just mushy or small and hard to catch. |
| I keep nose-diving when I try to catch a wave. | You are too far forward on your board. Scoot a bit towards the back. |
| I can’t stand up or I can only get to my knees before I fall over. | Practice your popup on the beach. Try to make it one motion if possible. Make sure you are trying on big enough waves and moving fast enough. |
| I can’t turn without falling. | Try not to lean into a turn, but rather scoot back on the board, push the tail into the water and push the middle and nose in the direction you want to go. |
What is surfing localism?
Surfers can get a reputation for being hostile, especially to beginners. Unfortunately, this is sometimes true. The reason for hostility is sometimes due to localism, sometimes due to not following surf etiquette, and sometimes just because some people are mean.
In my experience, other surfers have been mostly very positive and supporting out in the water. However, I usually surf at places where there is not a strong sentiment of localism and people aren’t too serious.
Localism in surfing is when surfers who live near a particular break don’t like outsiders surfing their waves. If it sounds silly and immature, that’s because it is. No one owns the waves, but some surfers think they do. It is an unfortunate part of the surfing community in some areas.
Fortunately, localism really only exists around intermediate to advanced surf spots, and everyone understands which spots are appropriate for beginners.
The bottom line is, be a good person, respect surfing etiquette, and try to stay out of people’s way. Also, don’t be discouraged by people who are disrespectful. Just do you!
Is it worth taking a surf lesson?
I wrote a whole article on why I recommend taking a surfing lesson. If you are a true beginner and have never surfed before, I think a lesson is a good idea. You will learn so fast from an experienced surfer who is actually good at teaching others, a trait that many surfers lack!
The bottom line is, by taking a lesson, you are paying someone to teach you how to surf. Instructors know how to correct your mistakes and can help you face to face. That is extremely valuable. In addition, I also recommend reading articles like this one to help you improve outside of the water.
Conclusion
Hopefully this article helped you get started learning how to surf. You won’t really be able to practice until you are in the water, but I hope this guide got you off on the right foot.
Thank you for stopping by. Please check out my other articles if you are interested in learning how to surf. What are you waiting for? Get out there are catch some waves!
Heads up! Surfing is awesome but it can be dangerous! Learn more about how to stay safe and avoid dangers while surfing. If you are a beginner surfer, check out my other articles about surfing and my ultimate guide to learning how to surf.

?")


